Craft Punk
A few years ago I started a new family tradition of making homemade Halloween costumes with my son, Liam.
No, not like

Okay, I’ll skip to the finished products from the first couple years. Year one, a Creeper, from Minecraft:

I don’t even remember what started this tradition. I don’t remember whose idea it was, or how I decided to use cardboard as my medium (though that’s pretty much the most obvious decision ever), but I do remember how much fun it was working with cardboard. I found it to be most of the pleasure of 3D printing, without as much waiting and/or disappointment.
So the first year was pretty basic. Sadly, Liam got sick on Halloween that year and didn’t get to actually go out in it. He did get to answer the door for trick-or-treaters, at least.
The second year we upped our game a bit. This one features glowing eyes, and a web app for his phone that randomly plays Enderman sound effects.

The Stakes Keep Getting Higher
This year, though… this year… my wife says to me, she says, “Hey, I know! You and Liam should go as Daft Punk.
💀
I have drooled over Daft Punk helmets on Etsy for years. There’s a wide range of helmets available, from the ludicrously simplified children’s toys (that still manage a $150 price-tag) to the exquisite, as-good-as-the-originals, thousands of dollars kinds of affairs.
None of them looked plausible as a home project made with cardboard.
I searched. I watched YouTube videos. I found myself prostrate at the feet of a new teacher named the “Dali Lomo.” Oh man is this one awesome blog.
So, for obvious reasons (the opportunity for irony), Liam was assigned the Thomas mask, and I got the Guy-Manuel mask.
Thomas
I immediately set to work on Liam’s mask, which I figure was going to be the harder of the two. It seemed to me that the fidelity of the chrome of his mask was critical, and the hardest thing to accomplish. It meant that the “dome” needed to be immaculate. The Dali Lomo’s build guide involved making a dome out of cardboard (which sounds right up my alley), but also involves a ton of Bondo. I opted out of this, thinking that starting with a batting helmet would save me some time. I went to the local sporting goods store, and found this beauty on sale:

I think the helmet did save me some time, but nowhere near as much as I’d thought it would. What it did do for this project is add a lot of rigidity and durability to the mask, and give us a comfortable, head-shaped base from which to start. Before I was done, I’d cut a couple inches off the back of the helmet, cut the visor off the front, and cut the ears out. I also had to (my wife would probably like me to say “I chose to) fill in the vents with Bondo, so I didn’t entirely escape having to deal with Bondo (my first time—it’s kinda fun!).
I filled the gaps between the matboard visor pieces and the batting helmet with Sugru, by the way. I was quite concerned the paint wouldn’t stick, as they claim you can’t easily paint Sugru in their packaging. The Rustoleum primer I used is oil-based, which I think helped, and I put several coats on before painting the chrome on, and it worked quite well.


The first paint I tried was Krylong Looking-Glass Silver. This did not work well at all.

A bunch more sanding, and a new coat of Krylon Premium Metallic Chrome Original, and it looked like this:

Guy-Manuel
So, again, the Dali Lomo’s guide is fantastic.


One thing the Dali Lomo doesn’t mention too emphatically in the YouTube videos for these masks is the difficulty in marrying up the two halves of the matboard masks. There’s a seam that runs righ up the middle of the Guy-Manuel mask, and a similarly challenging seam along the left- and right-hand sides of the visor box on the Thomas mask that will split on you if you don’t reinforce them well enough. Basically, you will marry up the edges of the two pieces, which means that you will need to glue each side to a piece of thin cardboard (we used cereal boxes). I initially put dots of hot glue at each of the four corners of the cereal box. This let the seam immediately split up when I bend the matboard. You need that seam to be super solid. So instead of a few dots, you basically need to cover the whole area, like this:


Now, when it came to the visor, I went my own way.
The Dali Lomo cut a plastic bowl into pieces, glued them back together in a slightly different shape, glued on a transparency sheet, Bondo’ed the seam, and then wrapped the whole thing in heat-shrinking sunscreen vinyl.
Yowza.
I started out trying to do the same thing. I bought an acrylic globe, which I thought was about the size of my noggin. I thought I would cut it in half, glue on a transparency sheet, and spray the inside of the assembly with Nite Shades (which the Dali Lomo said would probably be easier than the wrap method).
Turns out cutting acrylic is a frickin’ nightmare. Every time I tried to make a cut, cracks splintered out in every direction.
Also, it turned out that the globe was too wide for the mask body to hold.
Luckily it wasn’t expensive.
The problem was, it was now just days before Halloween, and I had no plan for how to make this visor. Luckily I’d been thinking about backup plans the whole time, and at some point I’d come across some blog posts (sorry, I can’t credit them… don’t remember whose they were) regarding Worbla. Yeah, WORE-BLAH. Say it 5 times as slow as you like. It’s just fun.
Worbla is a thermoplastic—a plastic that becomes moldable at certain temperatures, and returns to a hardened, sturdy state at room temperatures. Specifically, I found that they make a transparent version. Thankfully, while doing this research, I ordered a 3-pack of sample sheets of Worbla (9”x9”, roughly) from Amazon, that included just one sheet of transparent Worbla (sometimes called TranspArt).
So, I read up on how to work with transparent Worbla. Thankfully, in my searches, I found this post on Worbla’s site: Using TranspArt for Clear Domes.
Having read that, I went to Home Depot and found an 8 inch glass globe (a replacement for lamp-post covers, I think).
I made a circular jig (out of cardboard, my fave medium!) that had a diameter just about an inch longer than the globe itself, and a height that was about the radius of the globe (4 inches), taped the 9”x9” sheet of TranspArt to it, hit it with the heat gun for about 10 minutes (it’s best, I read, to slowly get to the desired temperature, lest you get discoloring and bubbles), and pushed the glass globe into the TranspArt. It looked a bit like this:

After about 15 minutes of cooling, I pulled the globe out, and it looked great! It took some careful wiggling to get the TranspArt off the glass globe (it was darn-near vacuum sealed to the thing), but once it was free I had a very clear semi-sphere, with a hoop skirt on…

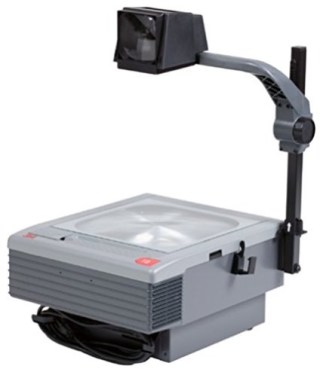
Then I had to figure out how to make the curved-plane front portion of the visor. I went to an office supply store and tried to find transparency sheets. You remember those? Like the things you’d use with one of these:
I couldn’t find them there, so I bought some sort of self-adhesive clear sheets from Swingline (you know, like “that’s my stapler”?). Wrong. Too flimsy.
I visited several stores, trying to avoid the inevitable, but each place told me the same thing. “You should go over to Satan’s house. I think they have them there!” So I gave in, and I went to Hobby Lobby. I’m sorry. I really am.
At Hobby Lobby, in among the supplies for building model train set landscapes, I found transparent 8.5”x11” sheets of vinyl in various thicknesses. I got 0.7mm, and they were perfect. 2 sheets for $5. I DID find transparency sheets at one other office supply store, in my searches, but they were $40 for a pack of 50, and I had no idea how thick they would be.
I sprayed the inside of my clear dome and the transparency sheet, and they looked great. Perfect, dark, and well-matched. Now… how to attach them?
It was really hard to try to hold the dome in place just to figure out where to place it within the frame of the mask. I tried several ways to try to hold it in place to see if it would fit, and to try to figure out how to glue it in place safely. I had one shot. I checked. I would not be able to get any more Worbla in town, and if I ordered more from Amazon the soonest I could get it was November 2nd.
I searched the house (at about midnight), and found a 10-inch diameter inflatable beach ball. Deflated just a bit, it made the perfect clothes-horse for the dome. It held it in place just right while I traced the outline of where the dome met the frame, which let me then glue the appropriate spots one at a time by matching up the outline marks.

Then I curved the transparency sheet around the front of the dome, glued that in place… and I was done!

Final Note on the Thomas Visor
In hind sight (nota bene to the reader looking to make her own Guy-Manuel mask), I could have just glued the sides of the sheet to the frame of the mask. The seam where the transparency sheet met the dome would have not been secured, but I don’t think it would have mattered. What I did do was glue it there, with superglue, which dried white, and made the seam quite noticeable.


The Gloves
There’s not a lot to tell you about making the gloves, except to say, A) I did those, too, and B) they take longer than you think they will. There’s a lot of cutting involved, and most of it is rounded corners. One tip: cut out the template, and then re-arrange the individual segments of each finger so that all the straight edges between the segments touch. It’s a lot faster this way, because you’re turning two cuts (the top of one segment and the bottom of another) into one cut, which, for two sets of gloves, turns 80 cuts into 40.
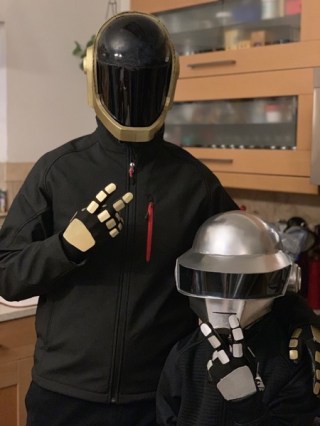
The Results
So, here’s where we ended up:

A Note on Visibility
One thing you might wonder, being the thoughtful reader you are, is “could you see while you were trick-or-treating, ostensibly in the dark in these things?”
I couldn’t fit my head into my son’s mask, but I’ll say that he’s not the most sure-footed kid in the world, and it was raining, and we were trick-or-treating after dark, and he never fell. He tripped a few times and very nearly ate it, but never actually fell.
My mask felt like wearing a motorcycle helmet with a tinted face shield, which is pretty siilar to wearing sunglasses (which cover your whole face). It wasn’t super easy to see details, but I could get around well enough.
What This Project Meant to Me
I didn’t know this the whole time I was working on this project, but some soul-searching and long conversations with my wife in the midst of it revealed something about my motivation to do this project. I grew up without a dad. My single mom bent and broke herself to make sure that I didn’t feel that loss, that I had role models of all kinds, and that I didn’t feel left out or different or weird because I didn’t have a dad, and she did a great job of it.
But the thing I do notice, looking back, is that there were a lot of things that felt out of reach for me because I didn’t have a parent that could walk me through those things. How to fix a car, for instance. I’m not saying only dads can do those sorts of things, but I am saying that in my childhood there was not a parent that filed that sort of role. I didn’t study computer science in school, for instance, because it didn’t occur to me that it was a profession that existed. I didn’t have those sorts of professions modeled for me. Likewise design of any kind.
I wanted to do this with my son because I thought it would be fun. I thought it would be good to get him doing something with his hands. He didn’t really get very involved this time, which is my fault. We didn’t start early enough, so I didn’t have time to let him fail a few times. A lot of the materials we were working with (super glue) and tools we were working with (mouse sander) were dangerous, too. My hope, though, and the thing that drove me to finish this, despite spending more than 30 hours on this over about 2.5 weeks, was that he would at least see me doing this. He would know “This is a thing people can do. Dad is not a costume-maker. If he can do it, maybe I can, too. Maybe Dad could even teach me.”
Maybe we can get his little sister involved, too.
Here’s to next year.
Happy (Belated) Halloween, dear reader!